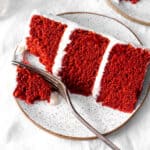
Vegan Red Velvet Cake
Sweet, moist red velvet cake layers held together with the creamiest and tangiest vegan cream cheese frosting. All 100% vegan.
- Prep Time: 20 minutes
- Bake Time: 35 minutes
- Total Time: 1 hour 30 minutes
- Yield: 1 8-inch Cake 1x
- Category: Cakes and Cupcakes
- Method: Bake
- Cuisine: American
- Diet: Vegan
Ingredients
For the Cake
3 cups all purpose flour
2 cups granulated sugar
2 tablespoons cocoa powder
2 teaspoons baking powder
1 teaspoon baking soda
1 teaspoon salt
1 cup nondairy yogurt*
1 cup nondairy milk
1 cup canola oil
1 tablespoon vanilla extract
1 teaspoon white vinegar
For the Frosting
4 oz vegan cream cheese, softened
1/2 cup non hydrogenated shortening
1/2 cup vegan butter, softened
3 cups powdered sugar
1/2 teaspoon vanilla extract
Instructions
- Prep: Preheat oven to 350 degrees F (175 C) and grease and line 3 6-inch or 2 8-inch round cake pans with parchment paper. Set aside.
- Cake Batter: In a large bowl whisk together the flour, sugar, cocoa powder, baking powder, baking soda and salt. In a separate bowl, vigorously whisk together the nondairy yogurt, nondairy milk, canola oil, vanilla extract, vinegar and food coloring. Pour wet ingredients into dry ingredients and whisk until just combined. Do not over-mix! A few lumps are ok.
- Bake: Divide cake batter evenly between the prepared pans. Set pans on center rack of preheated oven and bake for 35-38 minutes or until a toothpick inserted into the center of a cake layer comes out clean with only a few crumbs clinging to it. Allow cake layers to cool in the pan for 20 minutes before turning out onto a wire rack to cool completely.
- Make the Frosting: Add vegan cream cheese to a mixing bowl and beat with an electric hand mixer until completely smooth. Add in the shortening and vegan butter and beat until combined. Add the powdered sugar and vanilla to the bowl and beat until frosting comes together.
- Assemble: Once the cake layers have cooled completely, begin assembling. If you’d like to level your cake layers, now is the time to do so. You may find this video helpful. Set a cake layer on your serving plate of choice. Spread a generous layer of frosting over the top. Place second cake layer on top of the frosting and frost top and sides of cake. If you’re making a three layer cake, place the third layer before frosting the sides.
- Chill: Chill cake in the refrigerator for at least 30 minutes before serving. This will firm up the frosting slightly, making the cake easier to cut. Your slices will also have more defined layers. Store cake in the refrigerator, allowing it to sit at room temperature for about 15 minutes before serving.
Notes
*Frosted cake will keep in an airtight container in the refrigerator for 3-4 days. Unfrosted cake layers can be frozen for up to a month.
*When using nondairy yogurt in baking, it’s important to purchase unflavored and unsweetened yogurt.
*The amount of red food coloring you’ll need for this recipe will depend completely on the type you purchase. This will likely be anywhere from 1 teaspoon to 1 tablespoon. Start with a small amount and work your way up. Red color tends to come through stronger after the cake is baked.
*Leveling your cake layers is optional but encouraged. Doing so will make your cake more stable and professional-looking. To aid in this process, I like to wrap the cooled cake layers in plastic and chill them overnight. This firms them up and keeps crumbs to a minimum.
Find it online: https://censoredbaker.com/vegan-red-velvet-cake/
